Monday, February 9, 2015

Working with Neo4J

Introduction

Graph databases are emerging as one big thing as complex data especially social data is evolving. Facebook is managing and processing its users and their friends and their mutual social connection via graph processing. There are plenty of graph databases such as neo4j, OrientDB, FlockDB, GraphDB etc. available. neo4j is considered as the leading graph database.

Installation

Check Java

Since neo4j is written in java, so verify if java is installed on your machine. Anything >=7 is fine. It works with both OpenJDK7 or OracleJDK7.

Download neo4j

neo4j comes in two flavours. One is the Enterprise edition (not free) and one is Community edition (free). Download the Community edition (zip file) from the official site and you are good to go. Unzip the file neo4j-community-2.1.7-unix.tar.gz.

tar -xzvf neo4j-community-2.1.7-unix.tar.gz

This will create 'neo4j-community-2.1.7' directory. move into the extracted directory.

cd neo4j-community-2.1.7

start the neo4j server with

bin/neo4j start

Webinterface

Once the server is up and running, you can access it from web browser as well. neo4j runs on 7474 port. So access http://localhost:7474 to test if neo4j server is running. You should see something similar to the following figure.


WebConsole

It also offers a console in its webadmin interface. This interface provides much more detail about the neo4j server i.e. number of nodes, number of relations and the properties stored on the server. From this interface, you can execute cypher queries. Cypher is the query language used in neo4j. Access webadmin interface from http://localhost:7474/webadmin/

webadmin interface

console interface

Cypher (neo4j Query Language)

neo4j comes with its own query language called Cypher. There are many resources online about cypher and its syntax. One good (or shortcut) resource is a cheatsheet describing many of the queries.

see the link
http://assets.neo4j.org/download/Neo4j_CheatSheet_v3.pdf


Small program using Python

There are plenty of python libraries for neo4j available. However, py2neo is found to be more mature and actively maintained. It's latest release is 2.0.

The following program creates persons and establish their friendship relation.


 from py2neo import neo4j, rel  
 from random import randint  
 import random  
 import time  
 import sys  
 #initialize the random seed  
 random.seed(1234567)  
 about=["sample about me", "I appreciate this", "I don't like working",  
 "it is tidious to work for late hours"]  
 node_labels=["human", "physicist", "doctor", "phd"]  
 graph_db = neo4j.GraphDatabaseService()  
 
 def clear_db():  
   graph_db.clear()  
   print 'db size: %s' % graph_db.order  

 def create_sample_nodes(size):    
   for n in xrange(size):        
     node = graph_db.create(  
         {  
         "name":"node%s" % n,  
         "number": n,  
         "age": randint(20,50) ,  
         "gender": 'Male' if randint(1,2)==2 else 'Female',  
         "about_me": about[randint(0,3)],   
         "married": True if randint(1,2) == 2 else False,  
         "marks": random.uniform(60.1, 85.9)  
         }  
       )  
     node[0].add_labels(",".join(node_labels[0:randint(1,3)]) )      
   print graph_db.order 
 
 def read_sample_nodes(size):  
   for n in xrange(size):  
     node = graph_db.node(n)  
     print node  

 def create_friend_relations(size):   
   #first create friendship relation between random nodes  
   for n in xrange(size):  
     node = graph_db.node(n)  
     o = randint(0, size-1)  #select a random node
     #avoid loop relation with itself  
     if ( 0 == n ): o = randint(0, size-1)  
     other_node = graph_db.node( o )  
     props = { "since": time.time(),  
          "location":"%s:%s"%(randint(10,360), randint(10,360))  
         }  
     rel = node.create_path(("Friends",props), other_node)  
 if __name__=='__main__':  
   clear_db()      
   st_time = time.clock()   
   size = sys.argv[1]
   write_sample_nodes(size)
   create_friend_relations(size)    
   read_sample_nodes(size)  
   print 'time taken: %s' % (time.time() - st_time)  


Hope it helps to get start with neo4j database :)

References:
neo4j: http://neo4j.com/
py2neo: http://py2neo.org/2.0/

Sunday, February 8, 2015

Create Montage

ImageMagik tools can be used to combine multiple images into a single image.
For this, there is a tool called montage. it can be used to combine multiple images together and produce a single image.

montage command takes a space separated list of files. for example, file1.jpg file2.jpg
and the name of the output file as a last argument. For example, see the following command

montage file1.jpg file2.jpg file3.jpg OUTPUT.jpg

working with Cassanra

Introduction


Cassandra is a NoSQL database that brings best from two different projects BigTable (Goolge) and Dynamo (Amazon). It is believed to perform better from many other NoSQL solutions (See benchmakr link). It provides kye-value pair data model in which rows are sorted on key (only in one order) and columns are sorted on column_names based on the provided Comparator. The benefit of using columns is that you can sort them in both orders e.g. Asc and Desc. There is no theoratical limit on the number of columns. Cassandra can support millions of columns in one row.
It is less structured as compared to RDBMS where you first need to define a schema and then insert records. unlike RDBMS, column names are not specified in advance. each row could have different number of columns. So columns are sparse in Cassandra.

Data Model

Key points of Cassandra data model is briefly discussed below.

Keyspace - database name in RDBMS
ColumnFamily - equivalent to tables in RDMBS
Column - the atomic unit. Each column has a name against which values are inserted  along with timestamp (timestamp used to provide latest data. used in readrepair process)
Keys - each row is identified by a key, it should be unique

Design philosophy

Unlike RDBMS, data model designing in Cassandra is query driven. First you analyse your queries and then design your model accordingly.

For Text Indexing
There is no rich support to search for text as is the case with many RDBMS using the like keyword. There is one project builts atop Cassandra that provides such a text indexing and searching support. It is called Lucandra.  It based on Apache lucene and it uses Cassandra as its data storage. I have tried it with cassandra 0.6.x. However, from cassandra 0.7 onwards, this project is known as Solandra or Solr. which is based on solr, lucene and cassandra 0.7x+. At the time of writing this page, solandra only supported cassandra 0.7 which is the latest release. Now Cassandra has moved quite a lot and its latest release is 2.1.2 (will write about new changes in this version a later post). Solandra comes with cassandra and launches solandra server and cassandra within one jvm.

Experience with Solandra

There was an scenario in which I wanted to use my existing cassandra 0.7 instance with solandra for text indexing. As solandra comes with its own cassandra and launches it, there is no provided mechanism that helps in not launching solandra's own cassandra server. However, if we look into the code, we can stop solandra from launaching the cassandra. For this you need to comment CassandraUtils.startup() in SolandraInitializer class.

Solandra with Cassandra

One possible solution that worked for me is the following.

  • Run solandra as a standalone server (not from tomcat using the solandra.war)
  • Add your cassandra related schema from the code. in Cassandra 0.7, you can create or remove your keyspaces, column familys (entire schema) at runtime. 
  • As solandra requires a schema for storing and indexing the incoming data, you need to write a schema and upload it to the solandra server. 

in order to upload it to solandra, you can use 'curl' utility and the command would be like this.

SCHEMA_URL=http://localhost:8983/solandra/schema/myschema
SCHEMA=~/myschema.xml

curl $SCHEMA_URL --data-binary @$SCHEMA -H 'Content-type:text/xml; charset=utf-8'

echo "Posted $SCHEMA to $SCHEMA_URL"

the name you used at the end of 'http://localhost:8983/solandra/schema' which is 'myschema' would be used for reading from and writing to solandra.

You can also upload the schema from the java code using the java.net.HttpUrlConnection.


References
Cassandra: http://cassandra.apache.org/
Benchmark: http://www.datastax.com/resources/whitepapers/benchmarking-top-nosql-databases
Apache Lucene: http://lucene.apache.org/
Apache Solr: http://lucene.apache.org/solr/


Python-based Workflow project

Often times, it is required to define a pipeline also known as workflow to achieve one's goals. The concept of workflows is used in scientific research to process large volumes of data and also in business. These workflows are managed by workflow management softwares. In scientific domain, there are plenty of offerings such as Pegasus, VisTrails, Kepler, Chimera, Krojan, Falkon, Depends, etc.

The concept of workflow can be used in one's program in which you want to define a set of activites with their inputs and output and mutual connections, and the order of execution. There are quite a few good projects in python that let you achieve this. In this post, I am highlighting a few of those which I have read a little about. The analysis of them would be the goal for next post :)


  1. luigi: https://github.com/spotify/luigi
  2. FireWorks: http://pythonhosted.org/FireWorks/
  3. pyutilib.workflow: https://pypi.python.org/pypi/pyutilib.workflow/3.5.1
  4. GoFlow: a workflow engine for Django. https://code.djangoproject.com/wiki/GoFlow
  5. snakemake: https://www.biostars.org/p/88277/


you can also try to write your own Workflow Manager using python. One such attempt is found here ( http://supercoderz.in/2011/11/03/building-a-simple-workflow-engine-in-python/ ). An exhaustive list of python-based workflow projects can be found from this link (https://code.activestate.com/pypm/search:workflow/)

Thursday, February 5, 2015

auto reload in Tomcat

While developing JSP pages ( a bit old technology), the developer has not to concern about its compilation and reloading as it is handled by Apache Tomcat server itself. However, when you are working with servlets, it is the programmer who has to compile and provide the classes in correct directory structure to the tomcat. Moreover, once the servlet classes are placed and tomcat has been started, any change in those classes won't reflect as they will not be reloaded (in default settings). This behavior is annoying for a developer who is making changes and wants to see them. This can be easily overcome by adding the "reloadable" attribute to your application's Context element, either in its Context fragment or in Server.xml:

<Context ...="" reloadable="true">

After making this change, restart the tomcat server and try to place newly compiled classes. You should be able to see reloading lines in tomcat's log.

Apache Tomcat server can be downloaded from its official site http://tomcat.apache.org/

Cloud infrastructure Automation tools

Tools used to build and setup your virtual machines and sometimes your physical machines in your cloud setup (datacenter) fall into infrastructure automation or cloud orchestration category.

DevStack: for trying out the development setup of OpenStack.

PackStack: another tool that is believed to be stable enough for configuring a production level cloud setup using Openstack. It uses puppet labs underneath to configure available physical resources with required openstack services. At the moment it supports only RHEL (CentOS) and Fedora and their derivative distributions.

Puppet: A tool, developed by PuppetLabs, in which you define the configurations and then it configures the given resources (VMs).

Chef: Another tool in which you create your recipe for configuring a machine. A recipe defines what sort of configurations/installation you want in a machine. you can also use already built recipes or someother’s shared recipe.

Juju: A project by Ubuntu that uses its own charms. Charms define the packages/services you want to install. It maintains a repository of charms and you can explore it and discover the charm you want to configure in your environment. 

Crowbar: the open source deployment tool developed by Dell. Crowbar enables you to provision a server from the BIOS up to, via Chef, higher level server states. Crowbar can be extended via plugins called “barclamps.” So far there are barclamps available for provisioning Cloud Foundry, Zenoss, Hadoop and more.

AWS CloudFormation: Amazon Web Services CloudFormation, which helps Amazon Web Services customers do cloud orchestration. It is believed that you could theoretically do everything the other tools mentioned here with CloudFormation, but in his opinion it’s not as good and will be more time consuming.

A summarised view can be seen in the following link

Handy Linux commands/scripts

1. Security (Authentication and others)


1.1. Login check


#on fedora or ubuntu distr. check for last logins with dates
last

#on fedora distri. check for last invalid login attemps. (Note: run using root or sudo)
lastb

#send alert/email on ssh login
one simple way is to add sendmail line into ~/.bashrc file if you want to do user-specific alert. For instance, you want to get alert only if someone logged into a machine with a specific user.


IP="$(echo $SSH_CONNECTION | cut -d " " -f 1)"
HOSTNAME=$(hostname)
NOW=$(date +"%e %b %Y, %a %r")
echo 'Someone from '$IP' logged into '$HOSTNAME' on '$NOW'.' | mail -s 'SSH Login Notification' YOUR_EMAIL_ADDRESS

or you can write a monitoring and parsing program that will keep an eye on /var/log/auth.log for ssh login logs. and send alerts as soon as it detects any malicious access.

1.2. Useful OpenSSL commands


see certificate subject
openssl x509 -in certificateName -subject

see certitifcate in text form
openssl x509 -in certificateName -text

connect to a server acting as a client using openssl
openssl s_client -connect [server_ip/server_name]:port

if you have to pass certificate to this connect request
openssl s_client -connect [server_ip/server_name]:port -cert path-to-certificate

if you also know the CAfile or CApath you can also provide them
openssl s_client -connect [server_ip/server_name]:port -CApath path_to_CAdirectory

2. Networking related


#obtain your external ip
curl ifconfig.me

#port forwarding n tunneling using SSH
ssh userName@hostnam/ip -N -L localport:host:hostport -L localport:host:hostport

now add host with 127.0.0.1(loopback address for localhost) mapping into your /etc/hosts file

#dynamic port forwarding using SSH

to be done

#Setting system-wide proxy settings

sudo export http_proxy='http://IP:port'

where IP is the IP address of your proxy server and port is the port of that proxy server.

#dig to get detail DNS query information
dig +noall +answer www.google.com
dig +noall +answer -x 209.85.227.105

For other handy tools and tips, please follow the given link.
http://www.linuxhomenetworking.com/wiki/index.php/Quick_HOWTO_:_Ch04_:_Simple_Network_Troubleshooting#Sources_of_a_Lack_of_Connectivity

*Update hosts information in Windows as well
http://accs-net.com/hosts/how_to_use_hosts.html
Windows 95/98/Me c:\windows\hosts
Windows NT/2000/XP Pro c:\winnt\system32\drivers\etc\hosts
Windows XP Home c:\windows\system32\drivers\etc\hosts (I have tested this one)

3. User Management


#change the default shell for a user account

chsh

this command will ask for your password, and then the path to the new shell.

#password less sudo access
To allow a user with sudo access without password, edit /etc/sudoers on (ubuntu) and add the following line at the end 

<username> = (ALL:ALL) NOPASSWD: ALL

sample:
khawar = (ALL:ALL) NOPASSWD: ALL


reboot the system and you can access sudo without being asked for passwords

4. Process Management


#search for a specific process name and get its id and kill it.
ps -ef | awk '/Startup.py/ {print $2}' | xargs kill -9

5. Other Utilities


#output with nice formatting (if output has multiple columns)
Let's take the example of mount command. its output is not properly formatted. 

mount | column -t

#list directories only

ls -l | grep '^d' | awk '{print $NF;}'

#Split a big file
if you want to split a file on linux, use split command. lets say you have a big file of size 5GB, and want to split it in 3GBs.

split -b 3G  bigger_filename

where bigger_filename is the source file you want to split.

#format a drive

mkfs.vfat /dev/sdb1

#print file contents in reverse (opposite of cat) 

tac filename

#print file contents with line numbers

cat -n filename

we can also use nl command

nl filename

#file sizes of the given directory

du -h -d 1 directory_name

#convert output of your command to an image file

ls | convert label:@- PATH_TO_IMAGEFILE.png

This will generate an image file of the ls output. For this, X11 should be installed on your system. Not available on Mac OS X latest releases.

#send email (you should have sendmail installed)

echo "test msg" | mail -s test EMAIL_ADDRESS

this will send "test msg" (mail body) with subject "test" (by using -s flag) to the given EMAIL_ADDRESS

6. Search files and perform operations in one command

#find and remove files in one command

find . -type f -name "*.bak" -exec rm -i {} \;

#find files and replace text within it using sed

for file in `find src -name 'YOUR_FILE_NAME'`; do sed 's/SEARCH_STRING/REPLACE_WITH/g'
"$file" > tmp_file; mv tmp_file $file; echo "$file done"; done

#To find and delete empty directories

find -depth -type d -empty -exec rmdir {} \;

#Delete specific files using ls and grep within one directory

cd your_directory
ls -la | grep "username" | awk '{print $colposition}'|while read line do rm $line; done

where colposition is the column number of the filenames. At current display format of ls, it is 9th column that contains the filenames.

7. Installation related (on Ubuntu or Debian)


I experienced a situation in which a failed install script changed my start-stop-daemon scripts and did not rollback the changes. After some searching,  I found that the following command fixes such problem.

#reconfigure an improper installed package on Ubuntu or Debian distributions.
sudo apt-get install dpkg --reinstall


installing python libraries without admin user


Installing python libraries/packages is not very complex issues. Mostly, packages are available in Python Package Index (PyPi) and can be installed using pip or easy_install tools. for example see the following commands.

pip install package e.g.
pip install paramiko

However, in the standard installation procedure, a sudo or root permission is required as the installation procedure attempts to write library files in python's lib directory managed by root. Thus, we run into permission issues.

On a system without admin permission, we can still install python libs by following this procedure. We will use the same as above, which will fail to complete due to non-sudo user. But that is fine.

pip install paramiko

this will download the paramiko files in a directory displayed in command output on terminal.

Go to this directory and run the command 'python setup.sh install —prefix WRITEABLE_PATH'.

where WRITEABLE_PATH is the directory where you can write/create files.
Before running this command, make sure that the WRITEABLE_PATH exists and is included in PYTHONPATH variable.

export PYTHONPATH=WRITEABLE_PATH:$PYTHONPATH

now run the python setup.py install —prefix WRITETABLE_PATH

the modules/packages will be built and placed in this directory. Since this directory is part of your PYTHONPATH variable, you will be able to access these packages in your python code.

NOTE: you always need to set the PYTHONPATH to this directory before executing your python code.

Turn simple programs/scripts into daemons

At times, there are scenarios where you want to daemonize a program so that it could run continuously and also the process remains manageable. For this purpose, you could either write a program with supported libraries such as apache Daemon (Java) that enables your program to act as a process or you could write a init.d configuration script that will launch your program just like other process in linux.

There is another tool ’supervisor' that could assist you in achieving the same with very minimum of the efforts and with rich features to manage as well. The only thing required in transforming a program to a daemon process is to write a simple configuration file and place it in a special directory, managed by supervisor. Let’s start the process of converting one simple program into a deamon.

1- installation 


First install the supervisor package. For ubuntu alike distributions it comes with OS repository (tested on Ubuntu 14.10). Run apt-get as a root or sudo user.

apt-get install supervisor.

It can also be installed with pip or easy_install. Once installed, check if the service is running with service command or with ps -ef | grep supervisor. you can start|stop it with service command.

service supervisor start

more on installation, follow http://supervisord.org/installing.html

2- Write a configuration file


A configuration file with extension ‘conf' is required for your program. Each program will have its own configuration file. A sample configuration file is given below.

[program:MyDaemon]
command=/usr/bin/python /path/to/mydaemon.py

environment=NEW_ENV="TESTING",ACCESS_KEY="anything"
directory=/program/directory
user=khawar

autostart=true
autoreload=true
starttries=3

stderr_logfile=/path/to/log/error file
stdout_logfile=/path/to/log/out file

  • program: it is a keyword that gives a name to your program and the same name will appear in supervisor’s list of available programs. 
  • command: it takes the path to your script/program. you can provide full executable command or alternatively the program file with appropriate executable permission. In above example, a python code is launched with python command. 
  • environment: this gives you flexibility to specify the envrionment variables to be passed on to your program.
  • directory: directory for supervisor to 'cd' into before launching your program. This is helpful if your program requires/depends upon a special directory structure.
  • user: the user with which the program will be launched
  • autostart: it will ask supervisor to launch your program at system boot or whenever it is restarted.
  • autoreload: if set to true, will inform the supervisor to reload if your program crashes due to any reason.
  • startretries: number of attempts before the program is labelled as failed.
remaining two options redirect the std error and output to given files.

After writing the configuration file and setting the correct permissions on your program, place the conf file in /etc/supervisor/conf.d/

more on configuration files, follow http://supervisord.org/configuration.html

3- supervisor management


Now we need to inform supervisor about this new program. One way is to use command line management interface. use following command as root or sudo user.

supervisorctl

first we will ask supervisor to re-read the configurations. for this use reread command

supervisorctl reread

any new configuration file placed in supervisor's conf.d directory is parsed and loaded.

next is to enact the changes. for this, use update command

supervisorctl update

At this point, it will attempt to launch the given program. you can check the status of your programs with ‘status’ command. to see more options, use ‘help’ command

3.1 supervisor's web interace

Other than terminal interface, it also provides a web interface that you can enable through its configuration located in /etc/supervisor/supervisord.conf. Add the following configuration section in /etc/supervisor/supervisord.conf file.

[inet_http_server]
port= 9001 # port to be used. it could be any available port
username=user #to support basic http authentication
password=pass #password for basic http authentication

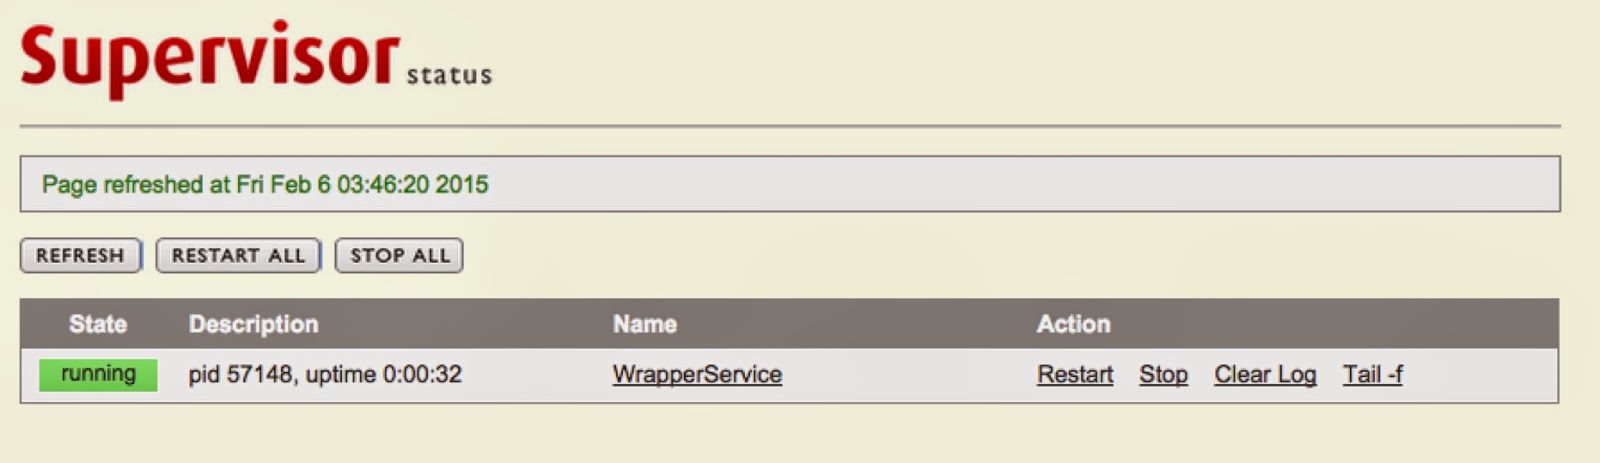
once updated, restart supervisor service and login to the web interface with configured username and password. You should see an interface shown below. 


For detailed documentation, see the following link

Thursday, December 4, 2014

automated service/process monitoring


Many of you already know about a famous project nagios (http://nagios.org) to provide IT infrastructure monitoring. However, there are other tools (at small scale or not very well known) as well. On a linux-based systems such as Ubuntu, process monitoring automation is very simple with the use of Monit project (http://mmonit.com/monit/). It can help you monitor your processes, services, files and provide a very simple web-interface to see the status of the monitored objects.

Installation

Monit supports multiple operating systems Linux, Mac OS, and BSD. You can install from source, or git repository. On Ubuntu, it is also available in standard ubuntu repository. Using apt-get, it can be installed on Ubuntu.

sudo apt-get install monit
Once it is installed, it can be configured to monitor programs/services. For this, edit its configuration file located on '/etc/monit/monitrc' and add your programs.

HTTP interface

Monit comes with its own HTTP interface with its own server. To configure it, add the following section in /etc/monit/monitrc file if not present or uncomment these lines.

set httpd port 2812
    use address 12.34.56.789 # only accept connection from localhost
    allow localhost    # allow localhost to connect to the server and
    allow admin:monit      # require user 'admin' with password 'monit'

This feature has to be enabled because its CLI also access the background process via HTTP. The limitation with this configuration is that monit can not be accessed from outside. All requests coming from outside are denied. However, it can be avoided if 'allow localhost' is commented or use some other IP range you want to connect from. Connecting from outside will require you to enter the configured user and password. Once configurations are written, it can be reloaded in monit with the following command.

monit reload

After the successful web login, you should see the following interface.

Example: Monitor Apache2 

A very simple configuration to monitor your apache2 service, you need to edit the /etc/monit/monitrc file

check process apache with pidfile /var/run/apache2/apache2.pid
start program = "/etc/init.d/apache2 start" with timeout 60 seconds
stop program = "/etc/init.d/apache2 stop"
if cpu > 70% for 2 cycles then alert
if cpu > 80% for 5 cycles then restart
if totalmem > 200.0 MB for 5 cycles then restart
if children > 250 then restart
if loadavg(5min) greater than 10 for 8 cycles then stop
if failed host localhost port 80 protocol http for 5 cycles
then restart

Please, check the paths and use the correct ones as per your operating system. These configurations are correct for Ubuntu 14.04 LTS. Once, configurations are written in /etc/monit/monitrc file, reload monit with 'monit reload' command. Now the web interface show a new entry under Process.


More information about configurations can be found here http://mmonit.com/monit/documentation/monit.html


Monit helps in providing monitoring capabilities for a single instance (machine). In order to acquire and collect a collective view of multiple monit instances, M/Monit project can be used (will be discuss in later post).


Other project for the same purpose is GOD (http://godrb.com/) etc. Another project that is based on Cassandra (a NoSQL database) is Munin (http://munin-monitoring.org/) that provides charting capabilities as well. it generates multiple charts such as load on CPU, memory consumption etc.

transcoding video formats to flv format

you can do this using ffmpeg. you can see the other post (http://khawarblog.blogspot.co.uk/2014/01/video-thumbnails-creating-montage.html) to know how you can install ffmpeg with LGPL license configuration. Once everything is ready, you can use the following command to transcode. For example, you have a test.avi file that you want to convert to flv format.

ffmpeg -i ./test.avi -ar 22050 -ab 32 -f flv avi.flv

It will generate a avi.flv output. However, there will be no sound in this. In order to tackle this issue, you have to reconfigure the ffmpeg with --enable-libmp3lame flag and repeat the installation process.

./configure --disable-gpl --enable-libmp3lame
make
make install

once it is done, you can use the above ffmpeg command and this time audio will work :)

Saturday, January 4, 2014

sql tips

# for quick debugging
instead of connecting first to the mysql server and then see the result of your query. We can do it in one command using the 'e' flag.
mysql -uUSER -pPASSWORD -D DATABASE -e "select * from your_table;"

you can also remove the default table formatting provided by mysql.
mysql -uUSER -pPASSWORD -D DATABASE -s -e "select * from your_table;"

#return limited rows from a result
MySQL provides a keyword 'limit' to achieve this task. Lets say you want to retrieve first 10 records from a query.

select * from your_table limit 10;

you can also specify the 'start' and 'end' of this result. Let's say you want to retrieve 10 records after first 10 records. This is a useful feature especially for pagination.

select * from your_table limit 11, 20;


#for oracle
Oracle provides a keyword 'rownum' that behaves exactly same as 'limit' in mysql.

select name, price
from items
where rownum > 5 and
rownum < 11;

create video thumbnails

To create video thumbnails, if you search on google, you might get plenty of free softwares. Howover, to use them in a program may be cumbersome job because of GUI issues. For the command line tools, I figured out ffmpeg is the best option available. But there is one problem with it. It has two licenses GPL and LGPL. with GPL, you can not have a software for commercial purpose. However, with LGPL, you can develop a commercial software but in this license, you have to compile ffmpeg yourself and some of the featuers are reduced. Another opton is to use gstreamer-ffmpeg as gstreamer comes with LGPL license. However, it is not clear how things will work.

On ubuntu, it is easy to install a LGPL ffmpeg and a simple command can create thumbnail for you.

Installation of ffmpeg with LGPL license.

cd dev_area
git clone git://git.videolan.org/ffmpeg
cd ffmpeg
./configure --disable-gpl
make
make install

when you do the ./configure --disable-gpl, you should see at the end 'LGPL license'.  Once installed, you can start creating thumbnails of your video.

Creating thumbnails of a video

for example, the following shell script create thumbnails from a given video file at different times.

for i in 4 8 12 16 20 24; do
ffmpeg -itsoffset -$i -i /localscratch/dev_area/test.avi -vcodec mjpeg -vframes 1 -an -f rawvideo -s 320x240 test$i.jpg
done

Other options

VLC can also be used to create video thumbnails. But I could not make it work on ubuntu machine. However, if you are interested to explore it further, please have a look at the following URL. I am planning to use its snapshot options to see if they work.

mplayer can also do this, but not tested.

using expect tool in shell script

Often times we run into problems with servers and there is a need to access multiple of them (if working in a cluster environment). Mostly, SSH is used to login into these systems and run the appropriate commands for debugging or maintenance purposes. However, SSH provides PKI-based or password-based authentication. with Password-based setup, it is very annoying to provide your password each time. Same situation occurs with other services such as FTP, telnet, rlogin, passwd etc. which needs user interaction for providing password to these commands. This makes it hard to write a automated script that requires no such user-interaction and speed-up the process. For this purpose, expect tool (http://expect.sourceforge.net/) is quite handy. For SSH only, I have tried sshpass tool and it also works with SSH. The following section provides details about using the expect tool.

Use expect on Ubuntu or other linux distros

In order to user it, first check if you have expect command available. in case you don’t have it, first install it on ubuntu using sudo apt-get install expect. For other linux distro, use appropriate package manager such as yum to install it.

Once it is installed, use the following script.

#!/usr/bin/expect

spawn ssh khawar@IP_ADDRESS/HOSTNAME
expect "*?assword:*"
send - "<PASSWORD>"
send — “\r"
send -- "\r"
send -- "ls\r"
expect eof


replace <password> with your remote machine password and this will let you login into the remote machine. This example will allow you to login into the given host and see its entires because we are sending ‘ls’ command.

you can use scp command here for file transfer. the script will be straight forward.

#!/usr/bin/expect

spawn scp /home/khawar/boto_s3_test.py khawar@IP_ADDRESS:~/
expect "*?assword:*"
send - "<PASSWORD>"
send — “\r" expect eof

for sftp use the following script.

#!/usr/bin/expect

spawn -nottycopy -nottyinit sftp khawar@IP_ADDRESS
expect "*?assword:*"
send - "<PASSWORD>"
send — “\r" expect “sftp>" send -- "put \r" expect "sftp>" send -- "quit\r" expect eof

Using pexpect (python library) to pass password for password-based SSH authentication

In earlier post, I have talked about the expect tool. see http://khawarblog.blogspot.co.uk/2014/01/using-expect-tool.html. This post provides information about using a python library for the same purpose.
Python provides a library pexpect (https://pexpect.readthedocs.org/en/latest/) that behaves the similar as the expect tool. Since python is a high level language as compared with shell scripting, there is more power available to a user/developer to use it for various complex scenarios. Following is a sample using pexpect. This code launches a SCP command with password and transfers a local file to a remote server.


import pexpect
import sys

"""
username = will be your user
host = hostname or ip address of the remote machine
password = is password for the username on remote machine
"""
user_host="username@host"
user_pass="password"

filename="file path"
child = pexpect.spawn("scp  %s %s:~/" % (filename, user_host) )
#this will print the received output on stdout
child.logfile_read = sys.stdout
#the pseudo terminal waits for a line that ends with password: which is normally the case in ssh
child.expect(".*ssword: $")
#this will send user password to the terminal
child.sendline(user_pass)
#here it waits for EOF output
child.expect(pexpect.EOF)

print '\ndone'

Monday, June 13, 2011

CUnit test - Installation and sample Test

I tried installing CUnit with default prefix and settings in Ubuntu11.04, but I always got error during compilation. Major error was "Fatal error: CUnit/Basic.h: No such file or directory". After doing a bit of googling, I stumble upon to the following URL with the instructions given below.
http://ubuntuforums.org/archive/index.php/t-1727067.html

Step 1: Download CUnit package from Source Forge.
Step 2: Find where you saved the package on your system, and uncompress it:
tar xjf CUnit-2.1-2-src.tar.bz2

Step 3: Go into the CUnit-2.1.2 directory.
cd CUnit-2.1.2

Step 4: Run the following sequence of commands:
mkdir -p $HOME/local

./configure --prefix=$HOME/local
make clean
make
make install

Step 5: Goto the directory $HOME/local. Verify that you have the following sub-directories: doc, include, lib, and share. Each of these should have the products you seek.

Step 6. To build an application using CUnit, something like this is used:

gcc -Wall -I$HOME/local/include MyProg.cpp -L$HOME/local/lib -lcunit -o myprog

OR

g++ -Wall -I$HOME/local/include MyProg.cpp -L$HOME/local/lib -lcunit -o myprog

Note: In your source code, include CUnit header files such as:

#include "CUnit/CUnit.h";
#include "CUnit/Basic.h";

==How to run the program

Since this library is not part of the system lib path, we need to include it each time into system variables or pass them as flag (as we did in gcc/g++ command above).

lets include this path into system variable.
export LD_LIBRARY_PATH=$LD_LIBRARY_PATH:$HOME/local/lib

Now run the program

./myprog

==== Now with System wide installation and Testing====

After practicing above sequence and commands for compilation and execution, I tried the same logic with system wide installation which was giving me errors early on. In Ubuntu, CUnit's head files are located at /usr/local/include and its libs are available at /usr/lib. So the compilation command would be something like this.

gcc -Wall -I/usr/local/include MyProgram.cpp -L/usr/lib -lcunit -o myprogram

To run, simply try ./myprogram and it should work. in case if it doesn't, set the LD_LIBRARY_PATH as we did above.
first make sure /usr/lib is not part of the LD_LIBRARY_PATH by printing this variable by 'echo $LD_LIBRARY_PATH'
export LD_LIBRARY_PATH=$LD_LIBRARY_PATH:/usr/lib

==Mac OS X (10.6)
The same system-wide installation and execution instructions work for mac os x 10.6.

Thursday, June 9, 2011

Apache WebServer2 with Tomcat 7

On Mac OS X (10.6)

download Tomcat 7 from official site.
preinstalled and configured apache httpd server on Mac.

you have to download and installed mod_jk apache connector.

A mix of the following two articles enable me to use Apache webserver to server usual contents and tomcat to serve the jsp or servlet.
http://macdevcenter.com/pub/a/mac/2002/08/20/tomcat_integration.html?page=1

mod_jk installation instrcution from the this link
http://www.bartbusschots.ie/blog/?p=1347

though the first link can be used for the entire working, however the instructions for compiling and installing mod_jk are complex.

After doing all this, I got the following error message in mod_jk.log
[Thu Jun 09 13:40:27 2011] [53894:140735072558240] [info] ajp_connection_tcp_get_message::jk_ajp_common.c (1216): (ajp13) can't receive the response header message from tomcat, tomcat (127.0.0.1:8080) has forced a connection close for socket 20
[Thu Jun 09 13:40:27 2011] [53894:140735072558240] [error] ajp_get_reply::jk_ajp_common.c (2058): (ajp13) Tomcat is down or refused connection. No response has been sent to the client (yet)
[Thu Jun 09 13:40:27 2011] [53894:140735072558240] [info] ajp_service::jk_ajp_common.c (2543): (ajp13) sending request to tomcat failed (recoverable), (attempt=2)
[Thu Jun 09 13:40:27 2011] [53894:140735072558240] [error] ajp_service::jk_ajp_common.c (2562): (ajp13) connecting to tomcat failed.
[Thu Jun 09 13:40:27 2011] [53894:140735072558240] [info] jk_handler::mod_jk.c (2627): Service error=0 for worker=ajp13


After googling and hit a try, I came to know that the port mentioned in worker.properties and AJP connector settings in server.xml should be same. After chaning the port in worker.properties to 8009 (default in AJP/1.3 connector), things were working like charm.

Thursday, March 17, 2011

creating a ubuntu 10.04 server image for KVM

KVM a hypervisor.

on ubuntu machine, follow these steps

0-download ubuntu 10.04 or other releases
lets call this file ubuntu-10.04-server-i386.iso

1- install kvm using
aptitude install kvm

2- create a disk image using dd. let say 5GB disk image
dd if=/dev/zero of=ubuntu-server.img bs=1G count=5

3-assuming that iso and ubuntu-server.img files are in the same directory.
create kvm vm using the following command. This vm will have 512 MB memory.

kvm -m 512 -cdrom ubuntu-10.04.iso -boot d ubuntu-server.img

to test it, run the vm using

kvm -m 512 -cdrom ./ubuntu-10.04-server-i386.iso ubuntu_server.img

done

Friday, February 18, 2011

increase hard disk for your xen vm

Yesterday, when I was running my simulations, I came across a problem with available hard disk space. My simulations were generating tremendously amounts of logs and soon my hard disk was full and I could not complete other runs in my simulations. Fortunately, the issue was solved with few commands.

1- create an empty image using dd command
dd if=/dev/zero of=disk2.img count=5 bs=1G

this will create a file named disk2.img of size 5GB.

2- append this img to the existing img file of your xen vm. For instance, the name of my img file was disk.img
cat disk2.img >> disk.img

3- now you need to recreate the format
e2fsck -f disk.img

4-last step is to resize the img file using resize2fs. this will scan the img and looks for some changes happened and updates the filesystem table accordingly.
resize2fs disk.img

reboot your xen vm and use the command to get the available harddisk space. In ubuntu, use df -H to see the increased hard disk space.

Tuesday, August 31, 2010

python twitter

This post focuses on providing very basic information about twitter client API for python. I have written a python application that retrieves my tweets and submits my tweet after authentication.

you can use normal http python library 'urllib' to achieve this task. for example

conn_string = "http://%s:%s@twitter.com/statuses/update.json" % (usr,pwd)
tweet = urllib.urlencode({"status":tweet})
f = urllib.urlopen(constring, tweet)

or you can use 'twitter' python package provided here http://code.google.com/p/python-twitter/

Following is a very simple code that demostrate my initial use case.

import twitter
import sys


def getTwitterClient(option, args={}):
if ( option == 'simple' ):
return twitter.Api()
else:
return twitter.Api(username=args['username'], password=args['password'])

if ( sys.argv[1]=='simple' ):
username = sys.argv[2]
client = getTwitterClient('simple');
latest_posts = client.GetUserTimeline( username )
#prints your latest posts on twitter
print [x.text for x in latest_posts]

elif ( sys.argv[1] == 'upd' ):
username = sys.argv[2]
passwd = sys.argv[3]
client = getTwitterClient('auth', {'username': username, 'password': passwd})
update = client.PostUpdate('Today, neuGrid first demo went fine.  Our services performed well as expected')
print update


after saving this code in a anyname.py file. you can call it by using following sample commands.
#to retrieve only the posts
python anyname.py simple <USERNAME>

change <USERNAME> with your twitter username.

#to update your twitter status
python anyname.py upd YOUR_USERNAME YOUR_PASSWORD