Thursday, February 5, 2015

Turn simple programs/scripts into daemons

At times, there are scenarios where you want to daemonize a program so that it could run continuously and also the process remains manageable. For this purpose, you could either write a program with supported libraries such as apache Daemon (Java) that enables your program to act as a process or you could write a init.d configuration script that will launch your program just like other process in linux.

There is another tool ’supervisor' that could assist you in achieving the same with very minimum of the efforts and with rich features to manage as well. The only thing required in transforming a program to a daemon process is to write a simple configuration file and place it in a special directory, managed by supervisor. Let’s start the process of converting one simple program into a deamon.

1- installation 


First install the supervisor package. For ubuntu alike distributions it comes with OS repository (tested on Ubuntu 14.10). Run apt-get as a root or sudo user.

apt-get install supervisor.

It can also be installed with pip or easy_install. Once installed, check if the service is running with service command or with ps -ef | grep supervisor. you can start|stop it with service command.

service supervisor start

more on installation, follow http://supervisord.org/installing.html

2- Write a configuration file


A configuration file with extension ‘conf' is required for your program. Each program will have its own configuration file. A sample configuration file is given below.

[program:MyDaemon]
command=/usr/bin/python /path/to/mydaemon.py

environment=NEW_ENV="TESTING",ACCESS_KEY="anything"
directory=/program/directory
user=khawar

autostart=true
autoreload=true
starttries=3

stderr_logfile=/path/to/log/error file
stdout_logfile=/path/to/log/out file

  • program: it is a keyword that gives a name to your program and the same name will appear in supervisor’s list of available programs. 
  • command: it takes the path to your script/program. you can provide full executable command or alternatively the program file with appropriate executable permission. In above example, a python code is launched with python command. 
  • environment: this gives you flexibility to specify the envrionment variables to be passed on to your program.
  • directory: directory for supervisor to 'cd' into before launching your program. This is helpful if your program requires/depends upon a special directory structure.
  • user: the user with which the program will be launched
  • autostart: it will ask supervisor to launch your program at system boot or whenever it is restarted.
  • autoreload: if set to true, will inform the supervisor to reload if your program crashes due to any reason.
  • startretries: number of attempts before the program is labelled as failed.
remaining two options redirect the std error and output to given files.

After writing the configuration file and setting the correct permissions on your program, place the conf file in /etc/supervisor/conf.d/

more on configuration files, follow http://supervisord.org/configuration.html

3- supervisor management


Now we need to inform supervisor about this new program. One way is to use command line management interface. use following command as root or sudo user.

supervisorctl

first we will ask supervisor to re-read the configurations. for this use reread command

supervisorctl reread

any new configuration file placed in supervisor's conf.d directory is parsed and loaded.

next is to enact the changes. for this, use update command

supervisorctl update

At this point, it will attempt to launch the given program. you can check the status of your programs with ‘status’ command. to see more options, use ‘help’ command

3.1 supervisor's web interace

Other than terminal interface, it also provides a web interface that you can enable through its configuration located in /etc/supervisor/supervisord.conf. Add the following configuration section in /etc/supervisor/supervisord.conf file.

[inet_http_server]
port= 9001 # port to be used. it could be any available port
username=user #to support basic http authentication
password=pass #password for basic http authentication

once updated, restart supervisor service and login to the web interface with configured username and password. You should see an interface shown below. 
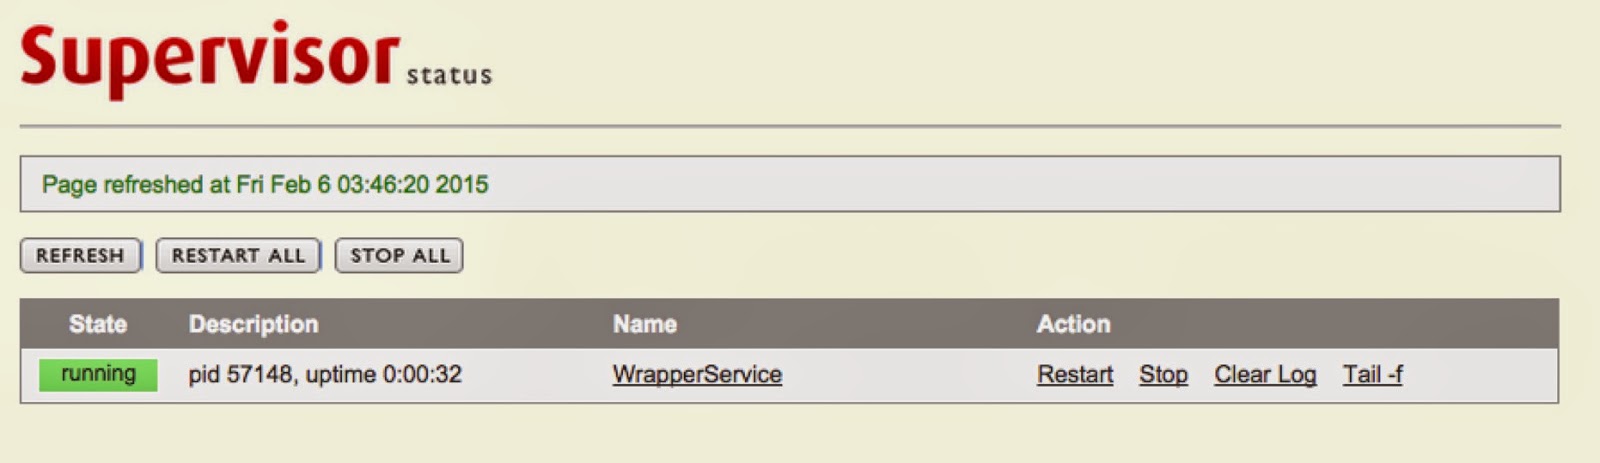


For detailed documentation, see the following link

Thursday, December 4, 2014

automated service/process monitoring


Many of you already know about a famous project nagios (http://nagios.org) to provide IT infrastructure monitoring. However, there are other tools (at small scale or not very well known) as well. On a linux-based systems such as Ubuntu, process monitoring automation is very simple with the use of Monit project (http://mmonit.com/monit/). It can help you monitor your processes, services, files and provide a very simple web-interface to see the status of the monitored objects.

Installation

Monit supports multiple operating systems Linux, Mac OS, and BSD. You can install from source, or git repository. On Ubuntu, it is also available in standard ubuntu repository. Using apt-get, it can be installed on Ubuntu.

sudo apt-get install monit
Once it is installed, it can be configured to monitor programs/services. For this, edit its configuration file located on '/etc/monit/monitrc' and add your programs.

HTTP interface

Monit comes with its own HTTP interface with its own server. To configure it, add the following section in /etc/monit/monitrc file if not present or uncomment these lines.

set httpd port 2812
    use address 12.34.56.789 # only accept connection from localhost
    allow localhost    # allow localhost to connect to the server and
    allow admin:monit      # require user 'admin' with password 'monit'

This feature has to be enabled because its CLI also access the background process via HTTP. The limitation with this configuration is that monit can not be accessed from outside. All requests coming from outside are denied. However, it can be avoided if 'allow localhost' is commented or use some other IP range you want to connect from. Connecting from outside will require you to enter the configured user and password. Once configurations are written, it can be reloaded in monit with the following command.

monit reload

After the successful web login, you should see the following interface.

Example: Monitor Apache2 

A very simple configuration to monitor your apache2 service, you need to edit the /etc/monit/monitrc file

check process apache with pidfile /var/run/apache2/apache2.pid
start program = "/etc/init.d/apache2 start" with timeout 60 seconds
stop program = "/etc/init.d/apache2 stop"
if cpu > 70% for 2 cycles then alert
if cpu > 80% for 5 cycles then restart
if totalmem > 200.0 MB for 5 cycles then restart
if children > 250 then restart
if loadavg(5min) greater than 10 for 8 cycles then stop
if failed host localhost port 80 protocol http for 5 cycles
then restart

Please, check the paths and use the correct ones as per your operating system. These configurations are correct for Ubuntu 14.04 LTS. Once, configurations are written in /etc/monit/monitrc file, reload monit with 'monit reload' command. Now the web interface show a new entry under Process.


More information about configurations can be found here http://mmonit.com/monit/documentation/monit.html


Monit helps in providing monitoring capabilities for a single instance (machine). In order to acquire and collect a collective view of multiple monit instances, M/Monit project can be used (will be discuss in later post).


Other project for the same purpose is GOD (http://godrb.com/) etc. Another project that is based on Cassandra (a NoSQL database) is Munin (http://munin-monitoring.org/) that provides charting capabilities as well. it generates multiple charts such as load on CPU, memory consumption etc.

transcoding video formats to flv format

you can do this using ffmpeg. you can see the other post (http://khawarblog.blogspot.co.uk/2014/01/video-thumbnails-creating-montage.html) to know how you can install ffmpeg with LGPL license configuration. Once everything is ready, you can use the following command to transcode. For example, you have a test.avi file that you want to convert to flv format.

ffmpeg -i ./test.avi -ar 22050 -ab 32 -f flv avi.flv

It will generate a avi.flv output. However, there will be no sound in this. In order to tackle this issue, you have to reconfigure the ffmpeg with --enable-libmp3lame flag and repeat the installation process.

./configure --disable-gpl --enable-libmp3lame
make
make install

once it is done, you can use the above ffmpeg command and this time audio will work :)

Saturday, January 4, 2014

sql tips

# for quick debugging
instead of connecting first to the mysql server and then see the result of your query. We can do it in one command using the 'e' flag.
mysql -uUSER -pPASSWORD -D DATABASE -e "select * from your_table;"

you can also remove the default table formatting provided by mysql.
mysql -uUSER -pPASSWORD -D DATABASE -s -e "select * from your_table;"

#return limited rows from a result
MySQL provides a keyword 'limit' to achieve this task. Lets say you want to retrieve first 10 records from a query.

select * from your_table limit 10;

you can also specify the 'start' and 'end' of this result. Let's say you want to retrieve 10 records after first 10 records. This is a useful feature especially for pagination.

select * from your_table limit 11, 20;


#for oracle
Oracle provides a keyword 'rownum' that behaves exactly same as 'limit' in mysql.

select name, price
from items
where rownum > 5 and
rownum < 11;

create video thumbnails

To create video thumbnails, if you search on google, you might get plenty of free softwares. Howover, to use them in a program may be cumbersome job because of GUI issues. For the command line tools, I figured out ffmpeg is the best option available. But there is one problem with it. It has two licenses GPL and LGPL. with GPL, you can not have a software for commercial purpose. However, with LGPL, you can develop a commercial software but in this license, you have to compile ffmpeg yourself and some of the featuers are reduced. Another opton is to use gstreamer-ffmpeg as gstreamer comes with LGPL license. However, it is not clear how things will work.

On ubuntu, it is easy to install a LGPL ffmpeg and a simple command can create thumbnail for you.

Installation of ffmpeg with LGPL license.

cd dev_area
git clone git://git.videolan.org/ffmpeg
cd ffmpeg
./configure --disable-gpl
make
make install

when you do the ./configure --disable-gpl, you should see at the end 'LGPL license'.  Once installed, you can start creating thumbnails of your video.

Creating thumbnails of a video

for example, the following shell script create thumbnails from a given video file at different times.

for i in 4 8 12 16 20 24; do
ffmpeg -itsoffset -$i -i /localscratch/dev_area/test.avi -vcodec mjpeg -vframes 1 -an -f rawvideo -s 320x240 test$i.jpg
done

Other options

VLC can also be used to create video thumbnails. But I could not make it work on ubuntu machine. However, if you are interested to explore it further, please have a look at the following URL. I am planning to use its snapshot options to see if they work.

mplayer can also do this, but not tested.

using expect tool in shell script

Often times we run into problems with servers and there is a need to access multiple of them (if working in a cluster environment). Mostly, SSH is used to login into these systems and run the appropriate commands for debugging or maintenance purposes. However, SSH provides PKI-based or password-based authentication. with Password-based setup, it is very annoying to provide your password each time. Same situation occurs with other services such as FTP, telnet, rlogin, passwd etc. which needs user interaction for providing password to these commands. This makes it hard to write a automated script that requires no such user-interaction and speed-up the process. For this purpose, expect tool (http://expect.sourceforge.net/) is quite handy. For SSH only, I have tried sshpass tool and it also works with SSH. The following section provides details about using the expect tool.

Use expect on Ubuntu or other linux distros

In order to user it, first check if you have expect command available. in case you don’t have it, first install it on ubuntu using sudo apt-get install expect. For other linux distro, use appropriate package manager such as yum to install it.

Once it is installed, use the following script.

#!/usr/bin/expect

spawn ssh khawar@IP_ADDRESS/HOSTNAME
expect "*?assword:*"
send - "<PASSWORD>"
send — “\r"
send -- "\r"
send -- "ls\r"
expect eof


replace <password> with your remote machine password and this will let you login into the remote machine. This example will allow you to login into the given host and see its entires because we are sending ‘ls’ command.

you can use scp command here for file transfer. the script will be straight forward.

#!/usr/bin/expect

spawn scp /home/khawar/boto_s3_test.py khawar@IP_ADDRESS:~/
expect "*?assword:*"
send - "<PASSWORD>"
send — “\r" expect eof

for sftp use the following script.

#!/usr/bin/expect

spawn -nottycopy -nottyinit sftp khawar@IP_ADDRESS
expect "*?assword:*"
send - "<PASSWORD>"
send — “\r" expect “sftp>" send -- "put \r" expect "sftp>" send -- "quit\r" expect eof

Using pexpect (python library) to pass password for password-based SSH authentication

In earlier post, I have talked about the expect tool. see http://khawarblog.blogspot.co.uk/2014/01/using-expect-tool.html. This post provides information about using a python library for the same purpose.
Python provides a library pexpect (https://pexpect.readthedocs.org/en/latest/) that behaves the similar as the expect tool. Since python is a high level language as compared with shell scripting, there is more power available to a user/developer to use it for various complex scenarios. Following is a sample using pexpect. This code launches a SCP command with password and transfers a local file to a remote server.


import pexpect
import sys

"""
username = will be your user
host = hostname or ip address of the remote machine
password = is password for the username on remote machine
"""
user_host="username@host"
user_pass="password"

filename="file path"
child = pexpect.spawn("scp  %s %s:~/" % (filename, user_host) )
#this will print the received output on stdout
child.logfile_read = sys.stdout
#the pseudo terminal waits for a line that ends with password: which is normally the case in ssh
child.expect(".*ssword: $")
#this will send user password to the terminal
child.sendline(user_pass)
#here it waits for EOF output
child.expect(pexpect.EOF)

print '\ndone'