Thursday, February 5, 2015

auto reload in Tomcat

While developing JSP pages ( a bit old technology), the developer has not to concern about its compilation and reloading as it is handled by Apache Tomcat server itself. However, when you are working with servlets, it is the programmer who has to compile and provide the classes in correct directory structure to the tomcat. Moreover, once the servlet classes are placed and tomcat has been started, any change in those classes won't reflect as they will not be reloaded (in default settings). This behavior is annoying for a developer who is making changes and wants to see them. This can be easily overcome by adding the "reloadable" attribute to your application's Context element, either in its Context fragment or in Server.xml:

<Context ...="" reloadable="true">

After making this change, restart the tomcat server and try to place newly compiled classes. You should be able to see reloading lines in tomcat's log.

Apache Tomcat server can be downloaded from its official site http://tomcat.apache.org/

Cloud infrastructure Automation tools

Tools used to build and setup your virtual machines and sometimes your physical machines in your cloud setup (datacenter) fall into infrastructure automation or cloud orchestration category.

DevStack: for trying out the development setup of OpenStack.

PackStack: another tool that is believed to be stable enough for configuring a production level cloud setup using Openstack. It uses puppet labs underneath to configure available physical resources with required openstack services. At the moment it supports only RHEL (CentOS) and Fedora and their derivative distributions.

Puppet: A tool, developed by PuppetLabs, in which you define the configurations and then it configures the given resources (VMs).

Chef: Another tool in which you create your recipe for configuring a machine. A recipe defines what sort of configurations/installation you want in a machine. you can also use already built recipes or someother’s shared recipe.

Juju: A project by Ubuntu that uses its own charms. Charms define the packages/services you want to install. It maintains a repository of charms and you can explore it and discover the charm you want to configure in your environment. 

Crowbar: the open source deployment tool developed by Dell. Crowbar enables you to provision a server from the BIOS up to, via Chef, higher level server states. Crowbar can be extended via plugins called “barclamps.” So far there are barclamps available for provisioning Cloud Foundry, Zenoss, Hadoop and more.

AWS CloudFormation: Amazon Web Services CloudFormation, which helps Amazon Web Services customers do cloud orchestration. It is believed that you could theoretically do everything the other tools mentioned here with CloudFormation, but in his opinion it’s not as good and will be more time consuming.

A summarised view can be seen in the following link

Handy Linux commands/scripts

1. Security (Authentication and others)


1.1. Login check


#on fedora or ubuntu distr. check for last logins with dates
last

#on fedora distri. check for last invalid login attemps. (Note: run using root or sudo)
lastb

#send alert/email on ssh login
one simple way is to add sendmail line into ~/.bashrc file if you want to do user-specific alert. For instance, you want to get alert only if someone logged into a machine with a specific user.


IP="$(echo $SSH_CONNECTION | cut -d " " -f 1)"
HOSTNAME=$(hostname)
NOW=$(date +"%e %b %Y, %a %r")
echo 'Someone from '$IP' logged into '$HOSTNAME' on '$NOW'.' | mail -s 'SSH Login Notification' YOUR_EMAIL_ADDRESS

or you can write a monitoring and parsing program that will keep an eye on /var/log/auth.log for ssh login logs. and send alerts as soon as it detects any malicious access.

1.2. Useful OpenSSL commands


see certificate subject
openssl x509 -in certificateName -subject

see certitifcate in text form
openssl x509 -in certificateName -text

connect to a server acting as a client using openssl
openssl s_client -connect [server_ip/server_name]:port

if you have to pass certificate to this connect request
openssl s_client -connect [server_ip/server_name]:port -cert path-to-certificate

if you also know the CAfile or CApath you can also provide them
openssl s_client -connect [server_ip/server_name]:port -CApath path_to_CAdirectory

2. Networking related


#obtain your external ip
curl ifconfig.me

#port forwarding n tunneling using SSH
ssh userName@hostnam/ip -N -L localport:host:hostport -L localport:host:hostport

now add host with 127.0.0.1(loopback address for localhost) mapping into your /etc/hosts file

#dynamic port forwarding using SSH

to be done

#Setting system-wide proxy settings

sudo export http_proxy='http://IP:port'

where IP is the IP address of your proxy server and port is the port of that proxy server.

#dig to get detail DNS query information
dig +noall +answer www.google.com
dig +noall +answer -x 209.85.227.105

For other handy tools and tips, please follow the given link.
http://www.linuxhomenetworking.com/wiki/index.php/Quick_HOWTO_:_Ch04_:_Simple_Network_Troubleshooting#Sources_of_a_Lack_of_Connectivity

*Update hosts information in Windows as well
http://accs-net.com/hosts/how_to_use_hosts.html
Windows 95/98/Me c:\windows\hosts
Windows NT/2000/XP Pro c:\winnt\system32\drivers\etc\hosts
Windows XP Home c:\windows\system32\drivers\etc\hosts (I have tested this one)

3. User Management


#change the default shell for a user account

chsh

this command will ask for your password, and then the path to the new shell.

#password less sudo access
To allow a user with sudo access without password, edit /etc/sudoers on (ubuntu) and add the following line at the end 

<username> = (ALL:ALL) NOPASSWD: ALL

sample:
khawar = (ALL:ALL) NOPASSWD: ALL


reboot the system and you can access sudo without being asked for passwords

4. Process Management


#search for a specific process name and get its id and kill it.
ps -ef | awk '/Startup.py/ {print $2}' | xargs kill -9

5. Other Utilities


#output with nice formatting (if output has multiple columns)
Let's take the example of mount command. its output is not properly formatted. 

mount | column -t

#list directories only

ls -l | grep '^d' | awk '{print $NF;}'

#Split a big file
if you want to split a file on linux, use split command. lets say you have a big file of size 5GB, and want to split it in 3GBs.

split -b 3G  bigger_filename

where bigger_filename is the source file you want to split.

#format a drive

mkfs.vfat /dev/sdb1

#print file contents in reverse (opposite of cat) 

tac filename

#print file contents with line numbers

cat -n filename

we can also use nl command

nl filename

#file sizes of the given directory

du -h -d 1 directory_name

#convert output of your command to an image file

ls | convert label:@- PATH_TO_IMAGEFILE.png

This will generate an image file of the ls output. For this, X11 should be installed on your system. Not available on Mac OS X latest releases.

#send email (you should have sendmail installed)

echo "test msg" | mail -s test EMAIL_ADDRESS

this will send "test msg" (mail body) with subject "test" (by using -s flag) to the given EMAIL_ADDRESS

6. Search files and perform operations in one command

#find and remove files in one command

find . -type f -name "*.bak" -exec rm -i {} \;

#find files and replace text within it using sed

for file in `find src -name 'YOUR_FILE_NAME'`; do sed 's/SEARCH_STRING/REPLACE_WITH/g'
"$file" > tmp_file; mv tmp_file $file; echo "$file done"; done

#To find and delete empty directories

find -depth -type d -empty -exec rmdir {} \;

#Delete specific files using ls and grep within one directory

cd your_directory
ls -la | grep "username" | awk '{print $colposition}'|while read line do rm $line; done

where colposition is the column number of the filenames. At current display format of ls, it is 9th column that contains the filenames.

7. Installation related (on Ubuntu or Debian)


I experienced a situation in which a failed install script changed my start-stop-daemon scripts and did not rollback the changes. After some searching,  I found that the following command fixes such problem.

#reconfigure an improper installed package on Ubuntu or Debian distributions.
sudo apt-get install dpkg --reinstall


installing python libraries without admin user


Installing python libraries/packages is not very complex issues. Mostly, packages are available in Python Package Index (PyPi) and can be installed using pip or easy_install tools. for example see the following commands.

pip install package e.g.
pip install paramiko

However, in the standard installation procedure, a sudo or root permission is required as the installation procedure attempts to write library files in python's lib directory managed by root. Thus, we run into permission issues.

On a system without admin permission, we can still install python libs by following this procedure. We will use the same as above, which will fail to complete due to non-sudo user. But that is fine.

pip install paramiko

this will download the paramiko files in a directory displayed in command output on terminal.

Go to this directory and run the command 'python setup.sh install —prefix WRITEABLE_PATH'.

where WRITEABLE_PATH is the directory where you can write/create files.
Before running this command, make sure that the WRITEABLE_PATH exists and is included in PYTHONPATH variable.

export PYTHONPATH=WRITEABLE_PATH:$PYTHONPATH

now run the python setup.py install —prefix WRITETABLE_PATH

the modules/packages will be built and placed in this directory. Since this directory is part of your PYTHONPATH variable, you will be able to access these packages in your python code.

NOTE: you always need to set the PYTHONPATH to this directory before executing your python code.

Turn simple programs/scripts into daemons

At times, there are scenarios where you want to daemonize a program so that it could run continuously and also the process remains manageable. For this purpose, you could either write a program with supported libraries such as apache Daemon (Java) that enables your program to act as a process or you could write a init.d configuration script that will launch your program just like other process in linux.

There is another tool ’supervisor' that could assist you in achieving the same with very minimum of the efforts and with rich features to manage as well. The only thing required in transforming a program to a daemon process is to write a simple configuration file and place it in a special directory, managed by supervisor. Let’s start the process of converting one simple program into a deamon.

1- installation 


First install the supervisor package. For ubuntu alike distributions it comes with OS repository (tested on Ubuntu 14.10). Run apt-get as a root or sudo user.

apt-get install supervisor.

It can also be installed with pip or easy_install. Once installed, check if the service is running with service command or with ps -ef | grep supervisor. you can start|stop it with service command.

service supervisor start

more on installation, follow http://supervisord.org/installing.html

2- Write a configuration file


A configuration file with extension ‘conf' is required for your program. Each program will have its own configuration file. A sample configuration file is given below.

[program:MyDaemon]
command=/usr/bin/python /path/to/mydaemon.py

environment=NEW_ENV="TESTING",ACCESS_KEY="anything"
directory=/program/directory
user=khawar

autostart=true
autoreload=true
starttries=3

stderr_logfile=/path/to/log/error file
stdout_logfile=/path/to/log/out file

  • program: it is a keyword that gives a name to your program and the same name will appear in supervisor’s list of available programs. 
  • command: it takes the path to your script/program. you can provide full executable command or alternatively the program file with appropriate executable permission. In above example, a python code is launched with python command. 
  • environment: this gives you flexibility to specify the envrionment variables to be passed on to your program.
  • directory: directory for supervisor to 'cd' into before launching your program. This is helpful if your program requires/depends upon a special directory structure.
  • user: the user with which the program will be launched
  • autostart: it will ask supervisor to launch your program at system boot or whenever it is restarted.
  • autoreload: if set to true, will inform the supervisor to reload if your program crashes due to any reason.
  • startretries: number of attempts before the program is labelled as failed.
remaining two options redirect the std error and output to given files.

After writing the configuration file and setting the correct permissions on your program, place the conf file in /etc/supervisor/conf.d/

more on configuration files, follow http://supervisord.org/configuration.html

3- supervisor management


Now we need to inform supervisor about this new program. One way is to use command line management interface. use following command as root or sudo user.

supervisorctl

first we will ask supervisor to re-read the configurations. for this use reread command

supervisorctl reread

any new configuration file placed in supervisor's conf.d directory is parsed and loaded.

next is to enact the changes. for this, use update command

supervisorctl update

At this point, it will attempt to launch the given program. you can check the status of your programs with ‘status’ command. to see more options, use ‘help’ command

3.1 supervisor's web interace

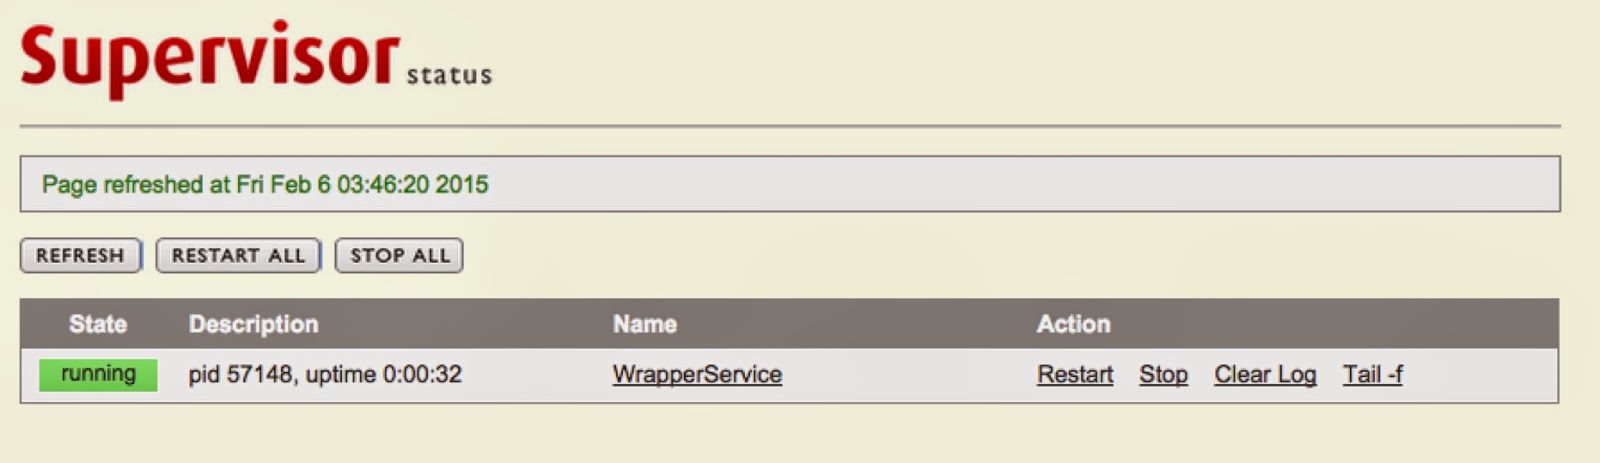
Other than terminal interface, it also provides a web interface that you can enable through its configuration located in /etc/supervisor/supervisord.conf. Add the following configuration section in /etc/supervisor/supervisord.conf file.

[inet_http_server]
port= 9001 # port to be used. it could be any available port
username=user #to support basic http authentication
password=pass #password for basic http authentication

once updated, restart supervisor service and login to the web interface with configured username and password. You should see an interface shown below. 


For detailed documentation, see the following link

Thursday, December 4, 2014

automated service/process monitoring


Many of you already know about a famous project nagios (http://nagios.org) to provide IT infrastructure monitoring. However, there are other tools (at small scale or not very well known) as well. On a linux-based systems such as Ubuntu, process monitoring automation is very simple with the use of Monit project (http://mmonit.com/monit/). It can help you monitor your processes, services, files and provide a very simple web-interface to see the status of the monitored objects.

Installation

Monit supports multiple operating systems Linux, Mac OS, and BSD. You can install from source, or git repository. On Ubuntu, it is also available in standard ubuntu repository. Using apt-get, it can be installed on Ubuntu.

sudo apt-get install monit
Once it is installed, it can be configured to monitor programs/services. For this, edit its configuration file located on '/etc/monit/monitrc' and add your programs.

HTTP interface

Monit comes with its own HTTP interface with its own server. To configure it, add the following section in /etc/monit/monitrc file if not present or uncomment these lines.

set httpd port 2812
    use address 12.34.56.789 # only accept connection from localhost
    allow localhost    # allow localhost to connect to the server and
    allow admin:monit      # require user 'admin' with password 'monit'

This feature has to be enabled because its CLI also access the background process via HTTP. The limitation with this configuration is that monit can not be accessed from outside. All requests coming from outside are denied. However, it can be avoided if 'allow localhost' is commented or use some other IP range you want to connect from. Connecting from outside will require you to enter the configured user and password. Once configurations are written, it can be reloaded in monit with the following command.

monit reload

After the successful web login, you should see the following interface.

Example: Monitor Apache2 

A very simple configuration to monitor your apache2 service, you need to edit the /etc/monit/monitrc file

check process apache with pidfile /var/run/apache2/apache2.pid
start program = "/etc/init.d/apache2 start" with timeout 60 seconds
stop program = "/etc/init.d/apache2 stop"
if cpu > 70% for 2 cycles then alert
if cpu > 80% for 5 cycles then restart
if totalmem > 200.0 MB for 5 cycles then restart
if children > 250 then restart
if loadavg(5min) greater than 10 for 8 cycles then stop
if failed host localhost port 80 protocol http for 5 cycles
then restart

Please, check the paths and use the correct ones as per your operating system. These configurations are correct for Ubuntu 14.04 LTS. Once, configurations are written in /etc/monit/monitrc file, reload monit with 'monit reload' command. Now the web interface show a new entry under Process.


More information about configurations can be found here http://mmonit.com/monit/documentation/monit.html


Monit helps in providing monitoring capabilities for a single instance (machine). In order to acquire and collect a collective view of multiple monit instances, M/Monit project can be used (will be discuss in later post).


Other project for the same purpose is GOD (http://godrb.com/) etc. Another project that is based on Cassandra (a NoSQL database) is Munin (http://munin-monitoring.org/) that provides charting capabilities as well. it generates multiple charts such as load on CPU, memory consumption etc.

transcoding video formats to flv format

you can do this using ffmpeg. you can see the other post (http://khawarblog.blogspot.co.uk/2014/01/video-thumbnails-creating-montage.html) to know how you can install ffmpeg with LGPL license configuration. Once everything is ready, you can use the following command to transcode. For example, you have a test.avi file that you want to convert to flv format.

ffmpeg -i ./test.avi -ar 22050 -ab 32 -f flv avi.flv

It will generate a avi.flv output. However, there will be no sound in this. In order to tackle this issue, you have to reconfigure the ffmpeg with --enable-libmp3lame flag and repeat the installation process.

./configure --disable-gpl --enable-libmp3lame
make
make install

once it is done, you can use the above ffmpeg command and this time audio will work :)